
DIY Fluted Table


Hi hello it’s Beau and I made us a coffee table!
When Matt and I decided on having a design duel for the living room and office (I’m tackling living room, Matt’s got the office), we set some ground rules, one of which was that there needed to be a DIY element. Pretty much all of our redesigns have some element of DIY, which we find important for making our space feel uniquely ours. Including a DIY in our projects also let’s us continue to hone our skills and comfort working with different materials, and usually keeps cost down a good bit. So, like, hooray for DIYs.
The first DIY element in my room was decorative picture frame moulding and I planned to call it a day at that, but after I watched Matt literally hand-build marvelous towering arched built-in bookshelves, two things occurred:
I remembered Matt is super competitive and a “duel” isn’t a healthy thing for either of us and
decided to at the very least make a table
Given that the direction for this space is “Modern Victorian” and a lot of the elements of the room weren’t so, well, modern, I knew a coffee table would be a great place to bring in a modern touch, like natural stone or an unusual shape. Looking around online I found a few coffee tables I loved but holy shit they are expensive—like CB2’s Darbuka Coffee Table or this fluted Carrara Marble Table that retails for $1600.
So, DIY it is!
My initial thoughts were PVC pipes for a fluted base, and maybe a slab of marble for the top or a wood top with a concrete overlay like we did for the countertops in Rosie The Trailer. I’ve seen folks use PVC pipes in various DIYs over the years but it isn’t a material I’d ever used to make something… pretty. So it felt kind of intimidating. I did a bit of scouring online to find a way to make sure paint and, in this case, limewash, would adhere well to the surface, and armed with the confidence of the internet I went searching for a top. A table top!
I decided a wooden top would be the best bet for making sure the table wasn’t too top-heavy, and I found an place called Craft Cuts that makes custom cuts of wood for pretty cheap, so I decided on a 28” round and 2” thick circular piece of Baltic Birch plywood. It took about 7 days to get to me, in which time I was able to figure out how the hell this table was gonna come together. I’ll save the technical details for the instructional below, but basically we used small wooden rectangles and a nail gun to create a secure and sturdy table.
As for the finish, there are so many options! I’d been fantasizing about limewash from Color Atelier (where we’re getting the plaster from for our bedroom suite shower!) and I realized it might be the perfect light-weight and easy thing for creating the natural stone effect I was after. Limewash is basically just paint with limestone mineral, which creates a plaster effect when brushed onto a wall, or in this case, a table. If you don’t want that stone / concrete look, you could definitely use a regular paint like Sherwin-Williams’s Urethane Trim Enamel paint, but the concept for this was “stone” so limewash it is.
So that’s all the ingredients! PVC, wooden table top, and paint. In all, this DIY cost me about $200, but had I used a traditional paint and a less thick tabletop, I could’ve probably gotten the cost down a good bit. PVC was also way more expensive than I expected, so that didn’t help. But for something that looks this good (if I do say so myself) and stands in for a $1600 real stone alternative, I think $200 sounds like a steal.
Below I’ve got all the tools and materials needed to make this yourself!

First coat of primer.

Third coat of limewash paint.

Coat of enamel!
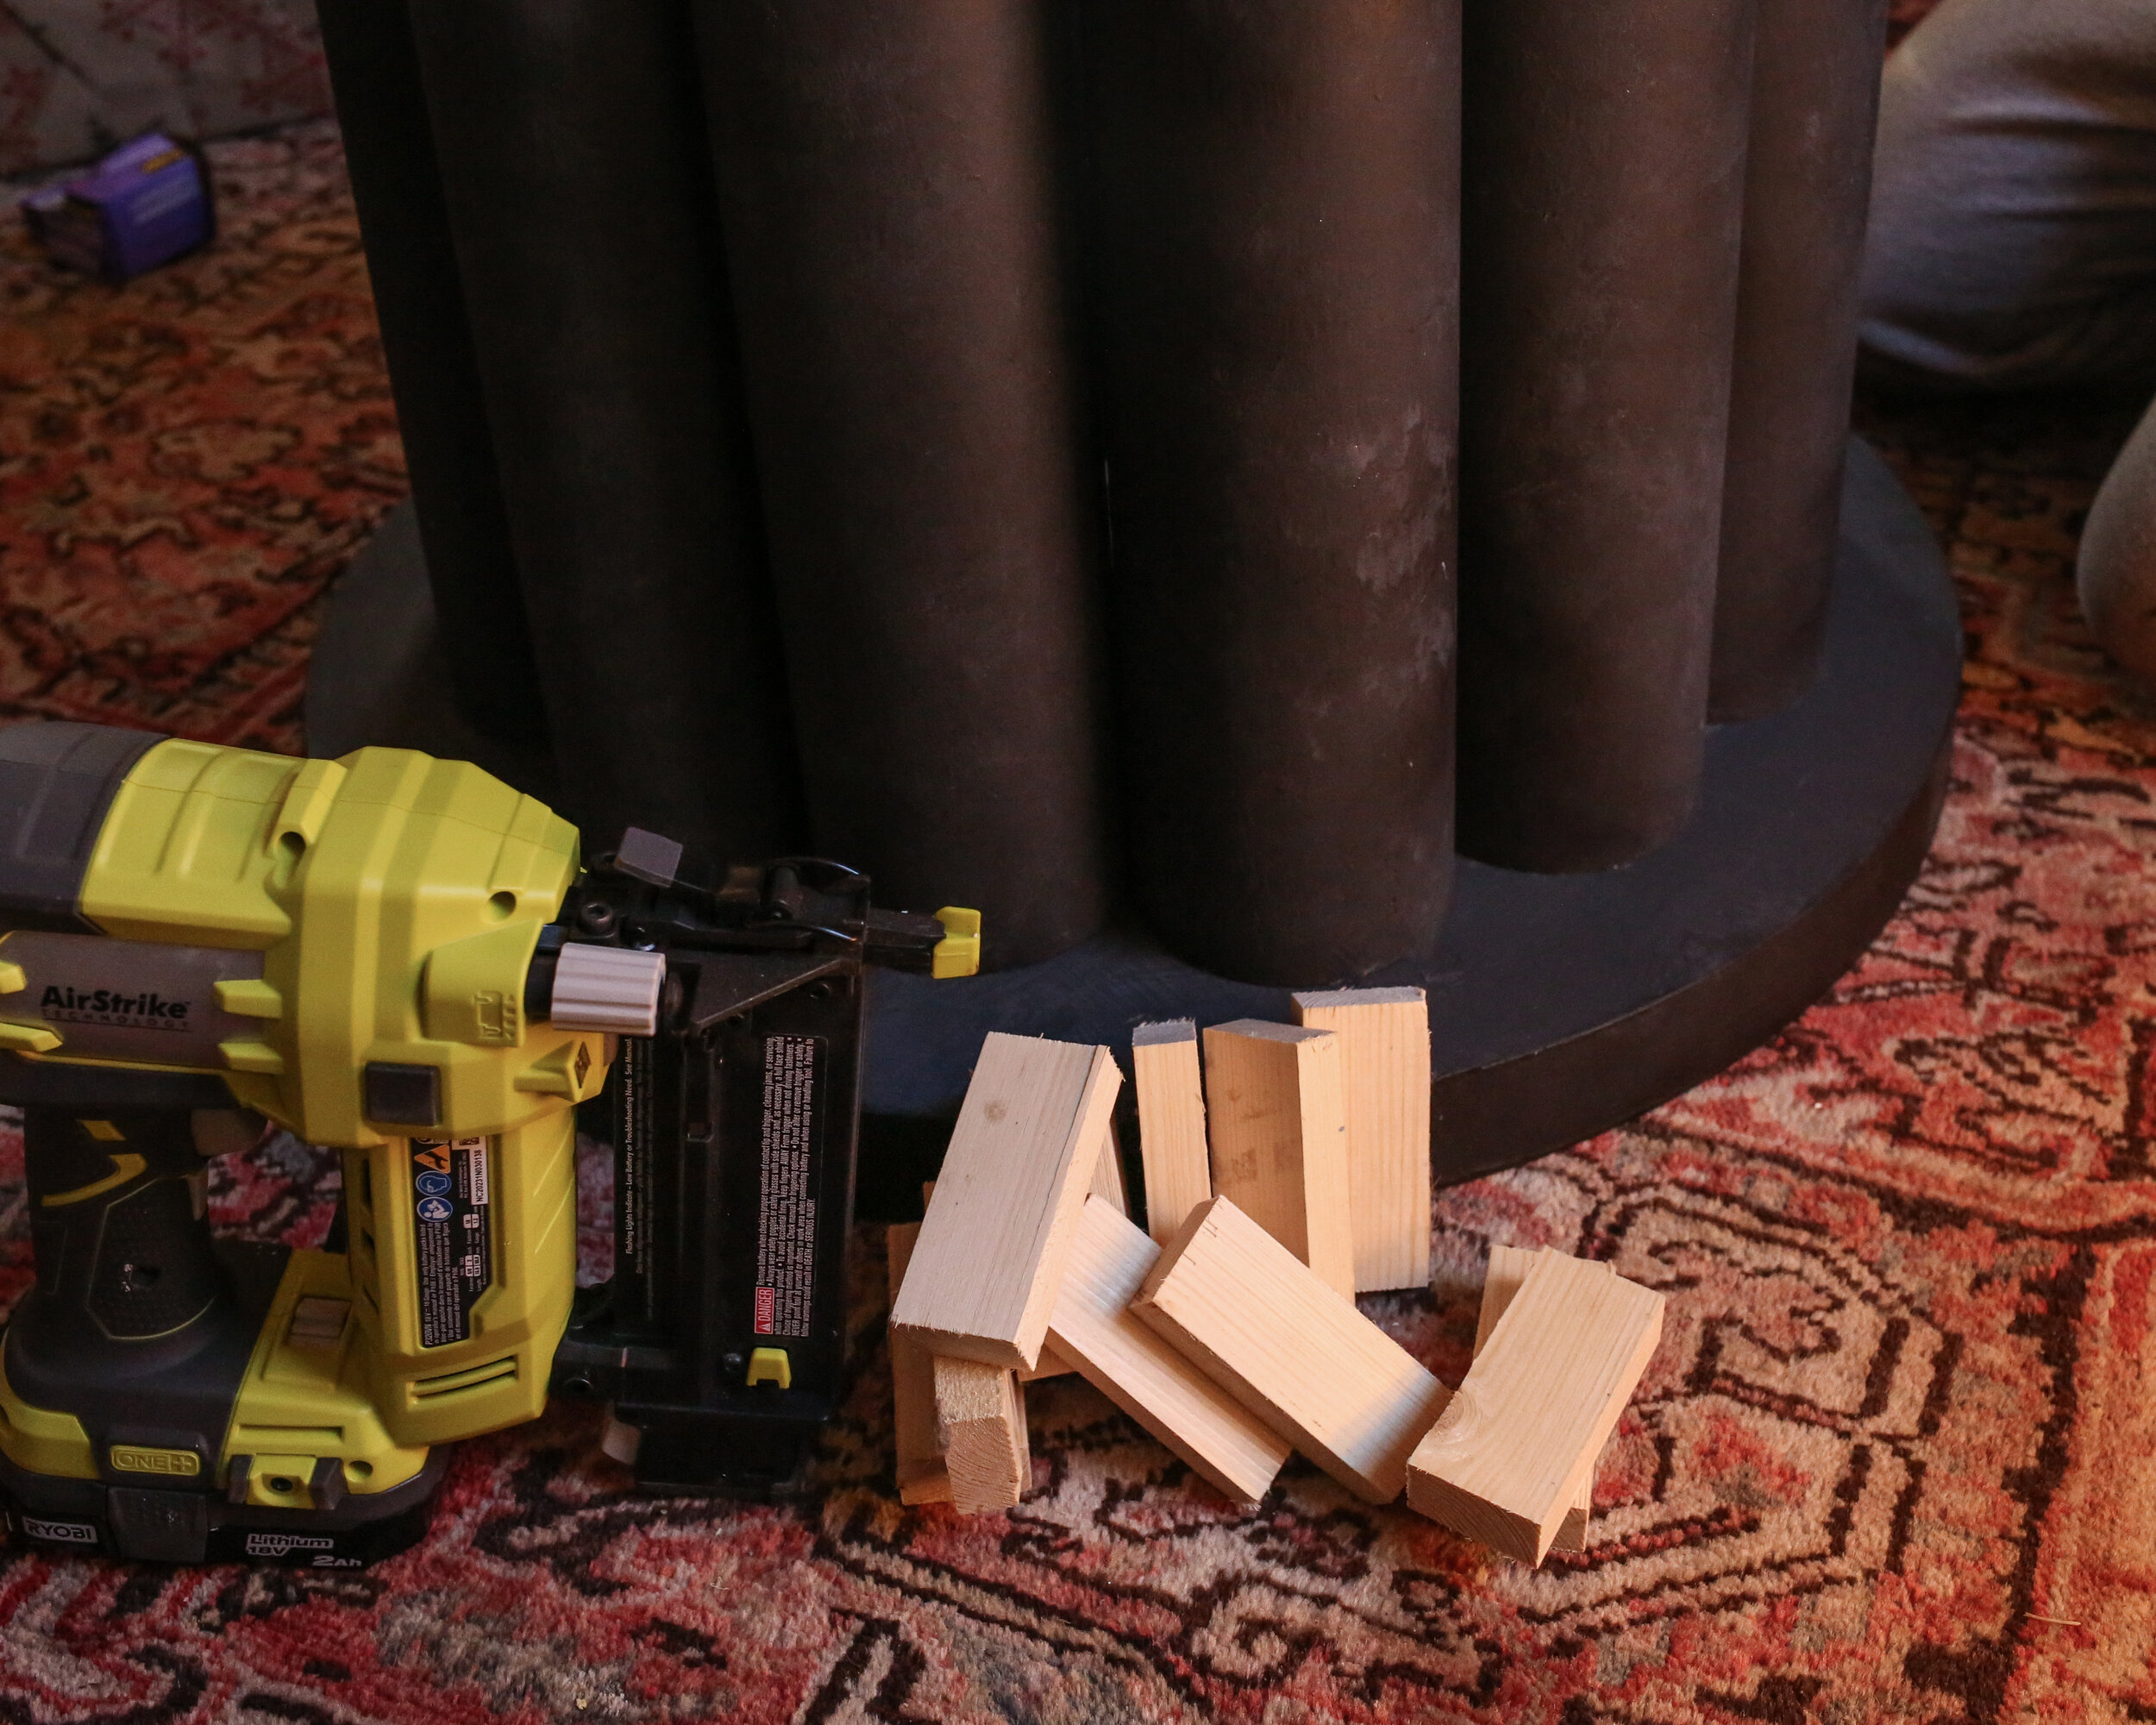
These 1x2 wooden blocks connect the legs to the table!

The blocks get placed on the inside of each Pipe

After they’ve all been placed, remove the pipe and use a nail gun to nail into table! Then replace pipe and nail it into the block.
DIY Fluted Coffee Table
Price: $125 - $300 || Time: 3 days (2 overnight curing days)
4” foam core PVC pipe cut to desired length (a home improvement store can do this for you)—see notes
Wooden tabletop (I used Craft Cuts Baltic Birch Plywood 2” thick 28” wide round cut)
All-surface Spray Primer (I used Zinnser Bulls Eye 1-2-3 Plus Spray Primer)
Exterior Primer & Paint (I used Color Atelier Limewash Primer & Velvet Noir Limewash Paint)
Clear enamel spray (I used Rust-Oleum Matte Clear Enamel spray)
1x2 wood fitted to PVC interior—see notes
Brad Nailer (we use Ryobi 18V Airstrike)
STEP 1 | PREP LEGS AND BASE
Working in a well-ventilated space and wearing a dust mask, use 220 grit sandpaper to sand the entire exterior surface of the PVC. This removes the outer protective layer and will allow the primer to adhere. Once you’ve gone over it multiple times and you can feel the PVC surface is no longer smooth, you can follow up with a higher grit sandpaper (such as 320 grit) to remove any visible grooves or striations left by the first sanding, but I didn’t bother.
Wearing your rubber gloves, apply acetone to your work rag and wipe the PVC clean of any dust or residue. Reapply acetone often to make sure the entire surface of each PVC pipe gets treated with acetone, as this will further help the primer adhere. Let air-dry for at least half an hour before priming and painting.
Prep your tabletop by sanding any imperfections and wiping clean with a damp rag.
STEP 2 | PRIME
Lay down painters cloth or plastic and use an “all-surface” spray primer for the initial coat of primer on both the legs and tabletop. This is just the first layer of primer meant to really cover all the nooks and crannies. Let dry for recommended time on package (usually 30 minutes to 2 hours) and then apply a second coat of primer designed for the paint you’re using. For instance, I used Color Atelier limewash, so for this step I used the Color Atelier Limewash Primer. Let this second coat of primer cure overnight. Don’t skip this curing step, sweetie! I know you’re thinking about it!
STEP 3 | PAINT
Once your primer has cured overnight, it’s time to paint! Paint the legs and complete table top surface according to the paint package instructions. You may need multiple coats (I did three coats of the limewash to achieve desired color), so allow to dry fully between each coat. Let cure overnight.
STEP 4 | SEAL
Now that we’re primed and painted, it’s time to seal it up! Even if you used a glossy exterior paint for your table, you’ll still want an enamel seal to protect from any minor spills or scratches. Spray all sides of the tabletop and PVC with a matte clear enamel spray and let dry. Test the enamel spray on the underside of the table first to make sure it doesn’t altar the color or look of your surface––having used limewash, I noticed the enamel spray made the finish darker and the “stone” effect less prominent, so I went really light with the enamel spray to avoid losing that plaster look. Let dry according to package instructions.
STEP 5 | BUILD
Place the tabletop on a flat work surface, with the top down. Place the legs on the bottom of the table in a circular pattern with no gaps between legs. This takes some tinkering to make sure it’s all centered and even. Carefully drop your cut wooden blocks into each leg and, very carefully, lift the legs off the table leaving the wooden blocks in place (we used a broomstick to keep the wooden blocks in place while lifting the legs). At this point you should have all of the wooden blocks on the table where each leg will go. Making sure not to shift the blocks, use a brad nailer to nail each wooden block into place. Put the legs back on top of the blocks, making sure they’re still perfectly aligned, and use your nailer on the sides of the PVC to nail into your wooden blocks.
And that’s it! Flip your table over and enjoy the fruits of your labor honey.
Notes:
Coffee Table Height | Coffee tables should be at or below the height of the seat of the sofa, usually 16-18 inches. So when you have your PVC cut, make sure to factor in the height of your table top to ensure you’re getting the correct measurement. We used a 2” thick tabletop, so we cut the PVC to 15”.
Wooden Blocks | These serve as your sturdy connection between the PVC and wooden table top. We used a very basic 1x2 wood and cut it to fit snugly the inside of our PVC pipe. Depending on the size of the PVC you choose, the length you need to cut these blocks will vary.