
Kitchen Cabinet Plans: How We Designed Our Kitchen

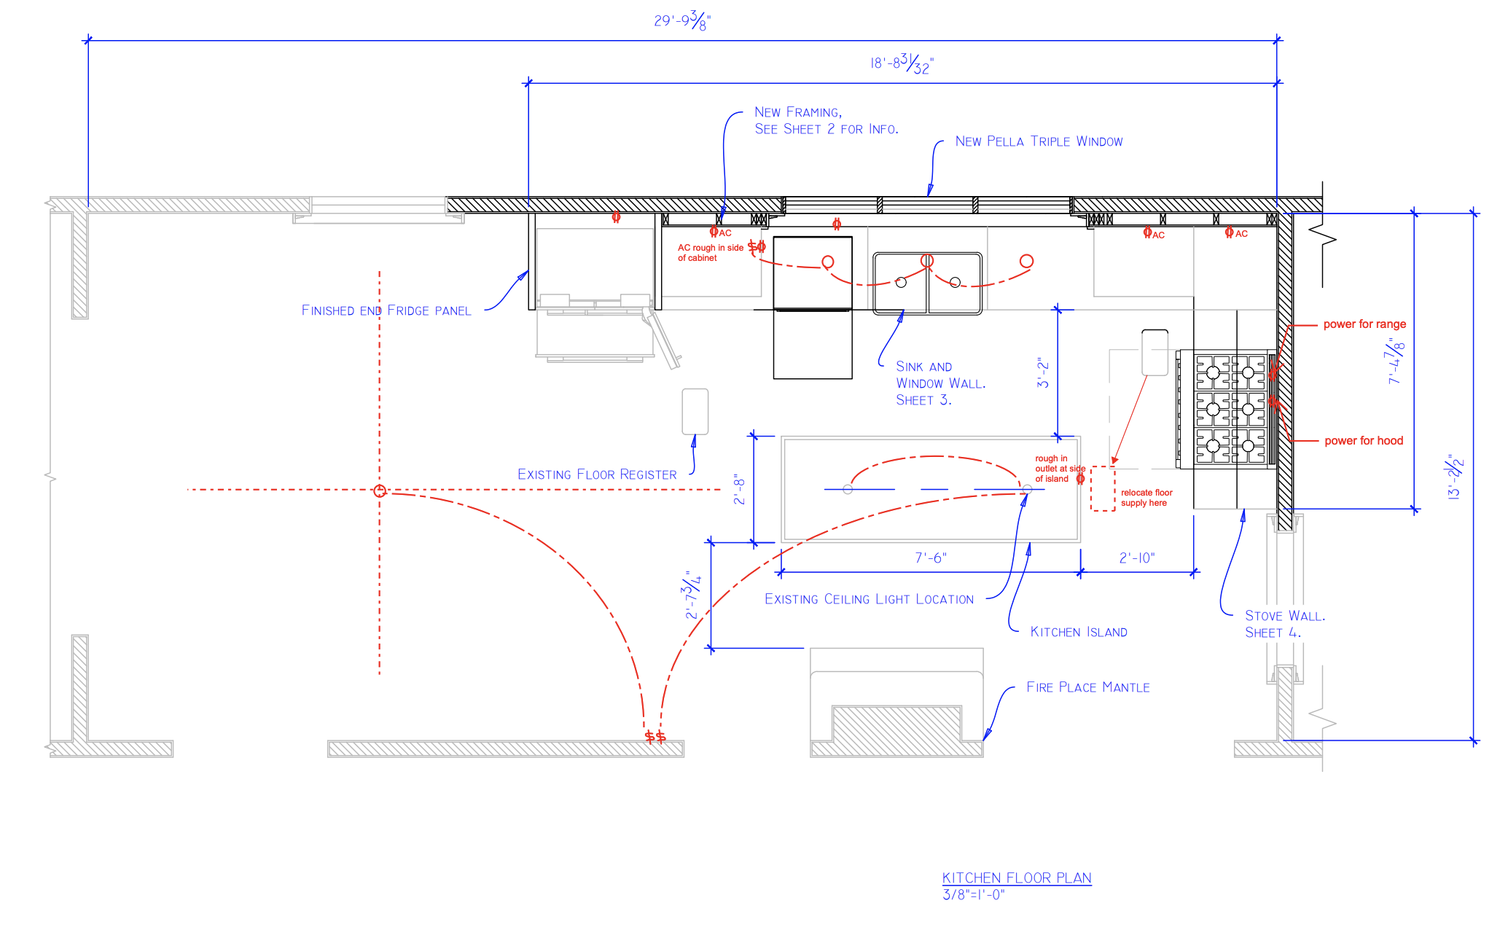
The overhead layout of our kitchen. Hope this helps give you an idea of the flow! The empty space to the left is where the dining table goes :)
A couple of weeks ago we got to share the newly renovated kitchen in our New Orleans home with you, a moment we’d been excited about for almost two years! We’ve done a lot of work on this home, but holy heck planning a kitchen is really something else entirely—i.e. really expensive and meticulous and time consuming and makes you want to walk into the Mississippi River with bricks securely tied to both feet.
Over the next few months I hope to share with you how we went about designing different elements of the space and picking out materials, but if you haven’t seen the original blog post with the big before-and-after reveal, start there.
Also important to note: we have a separate pantry right off the kitchen that is not pictured here, but it’s where dry food storage and some prep materials go, which is why you don’t see them here!
Before we had even picked a single paint color or thought of backsplashes, our first mission was to figure out what flow made the most sense for how we cook and live—and figuring out the cabinet layout while we did that was kind of super necessary. It was a big daunting pain in the ass to tackle first thing. But fun, too!
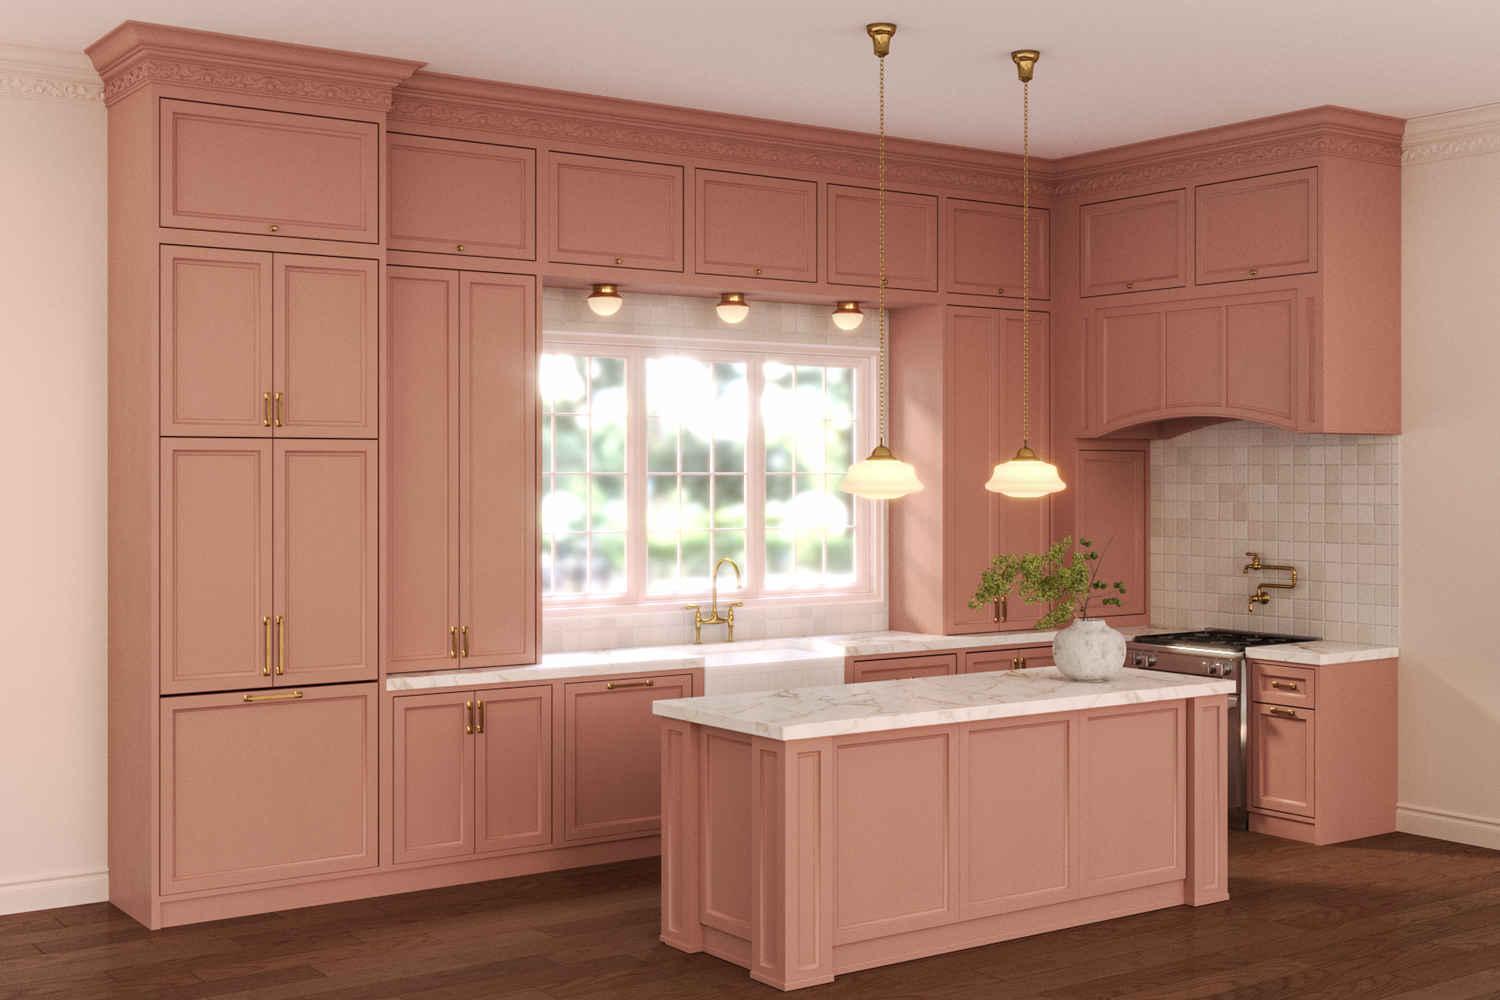
First up, we knew we wanted to take up all of the vertical space. Not only do upper cabinets that extend to the 11’ high ceiling give us a hell of a lot of storage, it also visually helps make the space feel so grand as your eye drifts up from the countertops to the ceiling. In my silly little opinion, all kitchens with upper cabinets should have them extend to the ceiling for a more intentional, luxe appearance that makes use of all available space.
Next, we knew the island would be appliance-free. I personally don’t love having a sink or range in a kitchen island because I need a big dedicated workspace when I’m cooking or baking. We had originally considered an antique French drapers table, like this one, to act as that dedicated workspace, but decided an island would meet our storage needs better. We designed the island to have the dimension a drapers table and the function of one, too.
Finally, we wanted the kitchen-to-dining-table flow to be immaculate. We had a peninsula in the original kitchen that, while certainly providing some counterspace, totally broke up that flow. We kept the space between the island and dining table completely clear for easy passage.
Oh, and we wanted as many countertop appliances as possible to be hidden, but not far out of reach. Like I don’t want to see the smoothie-stained blender base on the island, but I also don’t want to bend over and pull it out of a cabinet in order to use it. More on how we fixed that specific desire in a second.
We worked with a local custom cabinet maker Somos Carpinteros to take our ideas and a rendering our friend had created and bring it to life. It really helped us (and maybe them) that we had already pretty much designed the exact kitchen we wanted. There was minimal back and forth on the number of cabinets needed, the style, etc. Anytime you’re working on such a large project for your home with a contractor and crew, the more you have beforehand the better. Our cabinet team was able to quickly start with measurements and making plans and elevations that reflected our desired kitchen. I’ve shared some of those plans in this post for you!
The original rendering we had made long before we ever spoke to our kitchen team! It was so helpful for us to narrow down what we wanted, and hopefully helped the crew understand the vision.
Based off of how we want the kitchen to function, we decided on an L-shaped configuration that tucked the range/oven neatly into a corner where you could cook unbothered by guests or kids or life partners doing dishes; a sink placed squarely beneath an expanse of windows, the dishwasher to the left of it, and the fridge to the left of that. The cabinets surrounding each of those items came in to support the placement and function.
The lack of appliances in the island meant the entire thing could be used for storage and a waste bin, which is fantastic. Its primary function is to house things you’ll be using at an island—so lots of prep utensils and boards and any pans bigger than a baking sheet (which get slid into the narrow cabinets next to the oven).

The final cabinetry elevation. You can see in red where some adjustments were made during fabrication.
With so much storage out of the way in the island, we had a lot of room to play with how we wanted the remaining cabinets to function. We decided on two tall cabinets on either side of the sink, which woud have shelving for glassware and dishes. The bottom level of each of those tall cabinets has electrical so that they can be used to house appliances at the counter-level. Our contractor floated the idea of pocket doors to make appliance use more seamless—to which we both said… “what?”.
The pocket doors allow you to very easily open the cabinets, then slide the doors into the sides, making it easy and hazard-free to use an appliance like a microwave without leaving a cabinet door hinged open and in the way. Similarly it makes it easy to grab a stack of plates without needing a free hand to close the door, or we can just leave the doors open for an open-shelving effect.
Basically a cubby is built within the larger cabinet, and that cubby holds all the shelving. The space between the cabinet walls and the cubby is where the doors slide in, using a simple hinge and track system. It does mean you lose about 4” of total cabinet space, as the doors need somewhere to go, but in my opinion so worth it. When we’re cooking in the kitchen we just leave them open to grab items and use appliances with ease. And then afterwards during kitchen clean-up we close them and voilà the kitchen looks all nice and proper.
We did this pocket door system on the two tall cabinets flanking the window and also on the one small cabinet facing the range, which we call a bread box, that would’ve been an awkwardly tight place to have to open and close traditional cabinet doors.


Up at the very top we have eight large cabinets that you can’t reach without a ladder. We’re waiting on our railing and library ladder to arrive in for that, so for now those are empty, but we plan to use them as a place to store seasonal decorations, gift wrap, excess tupperware, that kind of stuff. It’s more storage than we need but that’s a problem I’m happy to have and one you’ll rarely find in old New Orleans homes.
Down below to the left and right of the sink you’ll see two tiny strips of cabinetry—those were actually not supposed to exist. There was some measurement error that wasn’t caught until cabinet fabrication had begun, and not adding extra slivers of cabinet would’ve made it asymmetrical. These tiny little guys have spice-rack style pull outs but we use them for cleaning supplies, sponges, etc. I feel more or less indifferent towards them.
The refrigerator (far left) and dishwasher (just beneath sink to the left) are paneled appliances that blend in oh so nicely. We’ll get more into the appliances in another post, so subscribe to our weekly email to make sure you don’t miss it!
As for the style of the cabinets, we went with inset cabinet faces for a sleek upscale look. We knew we’d be going a little off the wall with the colors, stone, and crown, so wanted to add a bit of balance with the cabinet faces feeling custom and classic. We chose brass hardware for all of our cabinetry, and we used the Claybourne Hardware Collection from Rejuvenation for hardware that made sense for each cabinet’s function—so pulls for most cabinets at or above counter height, knobs for cabinets below counter height, and bin pulls for drawers—while having a cohesive finish and style.
And you know what? For first-time kitchen renovators I think we did a pretty great job with all this cabinet planning. We truly have more storage than we could have ever imagined, which for folks who have a seemingly endless but necessary supply of cute Instagrammable kitchenware has brought our household a surprisingly calming vibe. Look out for more on this kitchen in the coming weeks, and as always, please feel free to write or comment here or on any of our social media with questions!
XOXO
Beau
(and Matt & Fox & Barley & Rye)